Creating a floor plan is one of the easiest ways to understand how a space is laid out before making changes to it. Whether you are planning a home renovation, rearranging furniture, designing an interior, preparing a property for sale, or simply trying to understand how much usable space you have, an accurate floor plan gives you a clear picture of the room.
But before you start drawing walls, placing doors, or adding furniture, there is one step that matters more than almost anything else: measuring the space correctly.
A floor plan is only as useful as the measurements behind it. If a wall is recorded incorrectly, a doorway is placed in the wrong position, or a window is overlooked, those small errors can affect everything that comes afterward. Furniture that appears to fit on the plan may not fit in the actual room, circulation paths can become too narrow, and an entire layout may need to be redrawn.
Fortunately, measuring a room does not require professional surveying equipment for most everyday floor planning projects. With a measuring tape, something to write down your measurements, and a consistent approach, you can collect enough information to create a reliable floor plan.
In this guide, we will walk through how to measure a room, what dimensions you should record, what details are commonly forgotten, and how to turn those measurements into an accurate digital floor plan.
Start With the Overall Shape of the Room
Before measuring individual features, take a moment to look at the room as a whole. Understanding its basic shape will make the rest of the measuring process much easier.
For a simple rectangular room, you will usually need two primary dimensions: the overall length and the overall width. Measure from one finished wall surface to the opposite finished wall surface, and then repeat the process in the other direction.
For example, if a room measures 15 feet from one wall to the opposite wall and 12 feet from the other two walls, your starting dimensions are 15 × 12 feet.
However, do not immediately assume that a room is perfectly rectangular. Many real spaces have alcoves, recesses, extensions, angled walls, structural columns, or other irregularities. Two walls that appear to be the same length may differ slightly when measured.
This is why it is important to measure the actual space rather than relying on assumptions.
If the room has an unusual shape, break it into smaller sections. Think of the room as a combination of simple shapes rather than trying to measure the entire area as one complicated shape. This makes it easier to record the dimensions and recreate the geometry later.
Measure Every Wall
Once you understand the overall shape, measure each wall individually.
This is particularly important for older buildings and irregular spaces. Even when a room looks rectangular, the walls may not be perfectly parallel or perpendicular to each other.
Start at one corner and work your way around the room in one direction. Record the length of each wall as you go. Keeping the measurements in the same order as the walls appear around the room will make it easier to transfer them into your floor plan.
If you are using a measuring tape, make sure it is pulled straight and held firmly. For longer walls, having another person hold one end of the tape can make the measurement considerably easier.
It is also useful to write down measurements immediately rather than relying on memory. When measuring several walls, doors, windows, and fixtures, it is surprisingly easy to confuse two similar numbers.
A simple sketch of the room can help. It does not need to look good. Draw a rough outline of the room and write each measurement next to the corresponding wall. You can later use this sketch as a reference when creating your digital floor plan.
Measure Doors Carefully
Doors are one of the most important details to record because they affect both the structure of the floor plan and the way people move through the space.
Start by measuring the width of the doorway. Then measure its position relative to the nearest wall or corner. Knowing the doorway's width without knowing where it sits on the wall is not enough to accurately reproduce the room.
You should also record the direction in which the door opens.
A door that swings into a room occupies a different amount of usable space depending on its position and opening direction. This becomes especially important when planning furniture. A wardrobe, sofa, desk, or bed placed too close to a door may interfere with its movement.
For sliding doors, record the opening width and the direction in which the door slides. If there are double doors, note the configuration as well.
These details may seem minor while measuring, but they become extremely useful once you begin experimenting with different layouts.
Measure Windows and Their Positions
Windows are another feature that should always be included in your measurements.
Measure the width of each window and record its position along the wall. Instead of simply writing down "window: 4 feet," also note how far the window is from the nearest corner.
For example, a sketch might show that the window is 4 feet wide and begins 3 feet from the left corner of the wall.
If you are creating a more detailed floor plan, you may also want to measure the height of the window from the floor. This is particularly useful when planning desks, countertops, cabinets, shelves, or other furniture that may sit underneath or beside a window.
Do not forget to measure windows on every wall. A window that is easy to overlook during the first walkthrough can become important later when deciding where furniture should go.
Record Fixed Elements in the Room
Not everything inside a room can be moved.
Before adding furniture to your floor plan, identify the elements that are permanently attached to the space. Depending on the type of room, this could include structural columns, built-in wardrobes, kitchen counters, sinks, toilets, bathtubs, radiators, staircases, fireplaces, or other fixed installations.
Measure their dimensions and their distance from the surrounding walls.
For example, if a structural column is located near the center of a room, simply drawing the room's outer walls will give you an incomplete representation of the available space. The column needs to be included because it changes how the room can actually be used.
The same applies to built-in storage. A wardrobe that cannot be moved should be treated as part of the room rather than as ordinary movable furniture.
Recording these elements early prevents you from designing layouts around space that does not really exist.
Measure the Ceiling Height When Necessary
A traditional floor plan focuses on the room as viewed from above, so ceiling height is not always required. However, recording it can be useful when the floor plan is being created for renovation or interior design purposes.
Measure from the finished floor to the ceiling.
Ceiling height becomes particularly relevant when planning tall storage, kitchen cabinets, lighting, ceiling fans, false ceilings, wall panels, or other vertical elements.
If the ceiling height changes within the room, record those changes as well. Beams, dropped ceilings, bulkheads, and other structural features can affect how the finished space is designed.
For a simple furniture layout, this measurement may not be essential. For a renovation project, it can become an important part of the overall documentation.
Check the Room for Irregularities
Real rooms are rarely as perfect as they appear.
Look carefully for small details that could affect the floor plan. This includes corners that are not exactly 90 degrees, walls that are slightly angled, recesses, niches, changes in wall thickness, and sections where the room becomes wider or narrower.
If the room has an unusual shape, take additional measurements rather than trying to estimate the missing dimensions.
One useful technique is to measure diagonally between opposite corners. In a perfectly rectangular room, the two diagonal measurements should be very similar. If they differ noticeably, the room may not be perfectly square.
This does not necessarily mean something is wrong. It simply means your floor plan should represent the actual room rather than forcing it into a perfect rectangle.
Accuracy matters more than visual simplicity when the goal is to create a floor plan that can actually be used.
Keep Your Measurements Consistent
Choose a measurement system before you begin.
You can work in feet and inches, meters and centimeters, or another system that suits your project. The important thing is to remain consistent.
For example, if one wall is recorded in feet and another in centimeters, you will have to convert the measurements before drawing. This creates unnecessary opportunities for mistakes.
Write measurements in a format that you can easily understand later. If you are working in feet and inches, be consistent with how you record fractional measurements. If you are using metric measurements, decide whether you will work primarily in meters or centimeters.
A consistent measurement system makes the transition from physical measurements to a digital floor plan much smoother.
Measure Twice Before You Start Drawing
One of the simplest ways to improve accuracy is also one of the easiest to ignore: check your measurements.
Once you have finished measuring the room, walk around it again and verify the important dimensions. Pay particular attention to walls, doorways, windows, and fixed elements.
If one measurement seems unusual compared with the others, measure it again.
It is much easier to spend an extra few minutes checking a dimension than to discover later that your digital floor plan is incorrect and needs to be rebuilt.
For larger rooms, another person can also help verify the measurements while you record them.
Create a Simple Measurement Sketch
You do not need to create the final floor plan while you are measuring.
Instead, create a rough sketch first.
Draw the approximate shape of the room and mark the location of the doors, windows, fixed elements, and other important features. Add your measurements directly onto the sketch.
The drawing can be messy. Its purpose is not presentation; it is documentation.
This approach separates two different tasks: collecting accurate information and designing the final floor plan.
Once you have finished measuring, you can use your sketch as a reference while creating the clean digital version.
Turn Your Measurements Into a Digital Floor Plan
After collecting your measurements, you can begin creating the actual floor plan.
Start with the outer walls and establish the correct dimensions of the room. Once the basic structure is in place, add doors and windows in their measured positions. Then add fixed elements such as columns, built-in storage, kitchen fixtures, or bathroom fixtures.
Only after the structure is accurate should you start experimenting with furniture and room layouts.
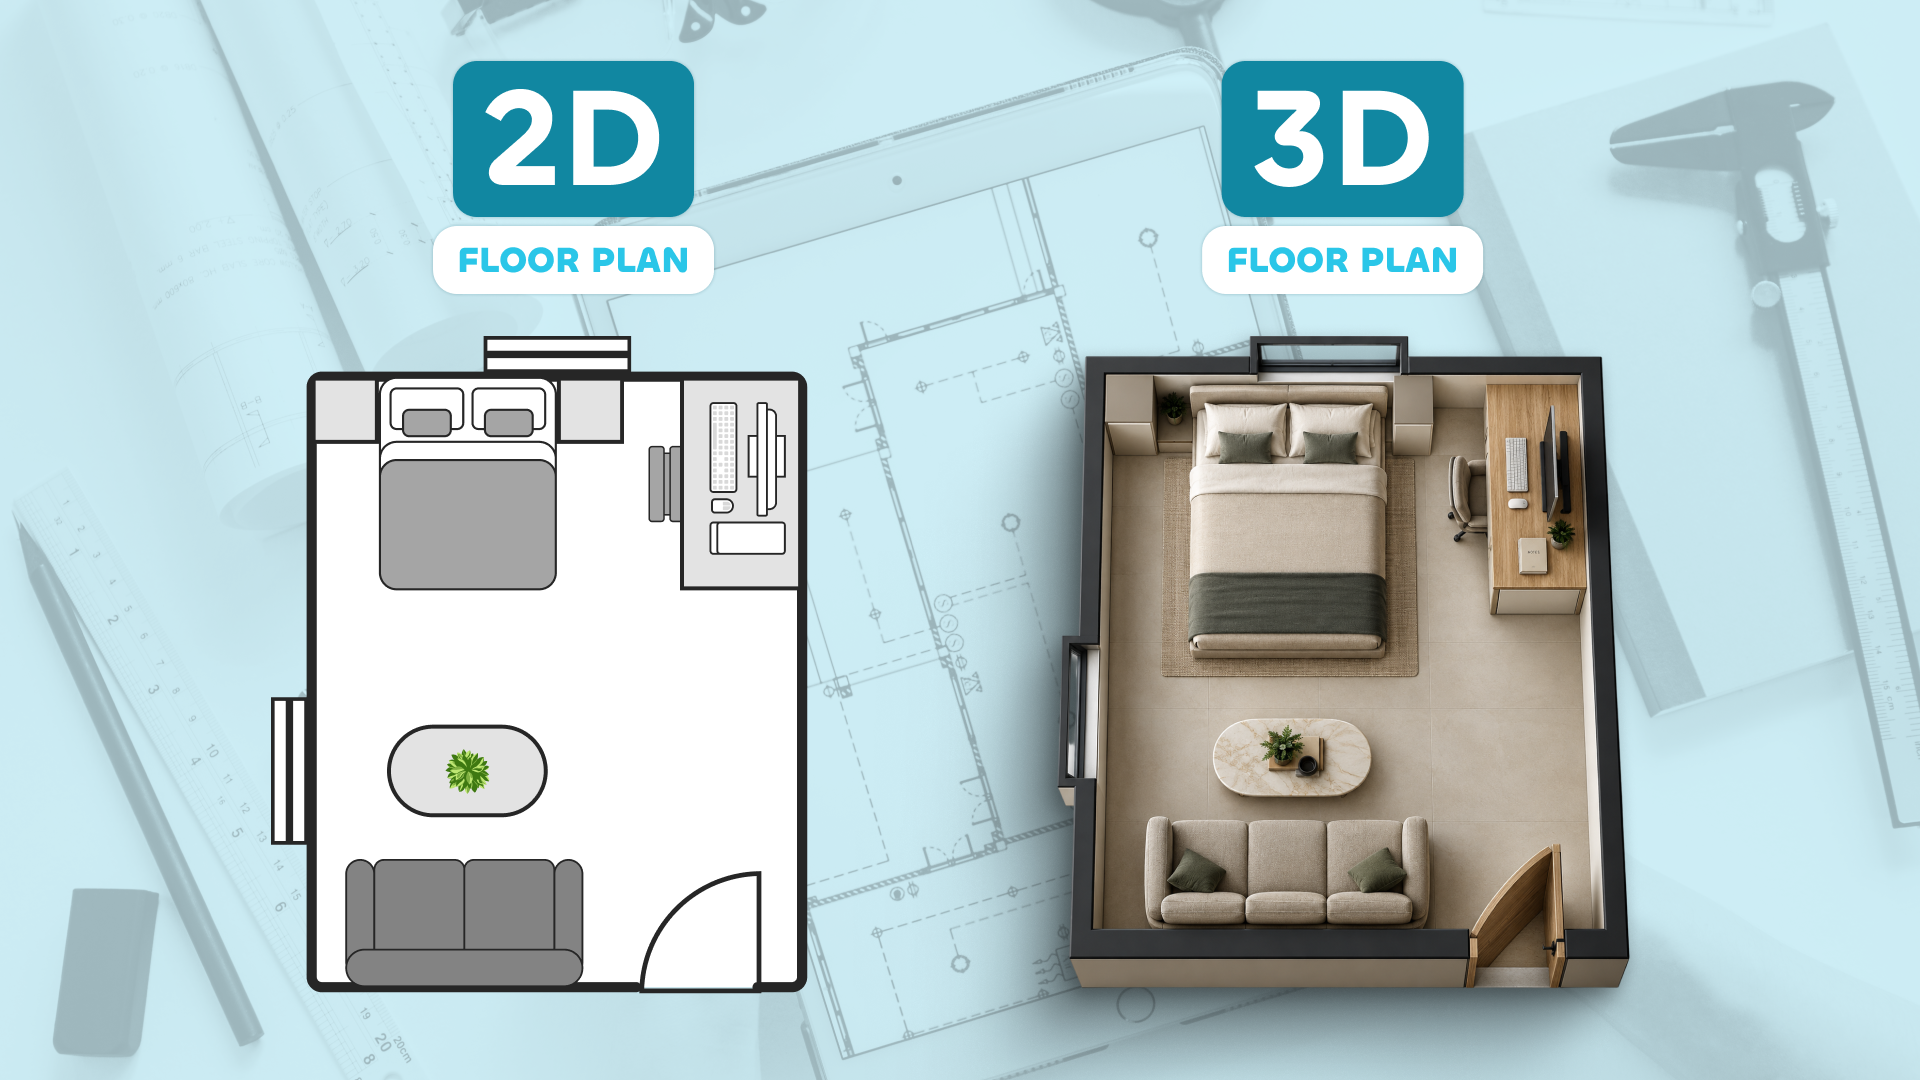
A digital floor planning tool makes this process much easier because you can adjust the layout without physically moving anything. You can test different furniture arrangements, change wall positions, add or remove objects, and see how different decisions affect the available space.
With Draw Floor Plan, you can create your room layout digitally, work with a customizable canvas and grid, and add common floor planning elements such as walls, doors, windows, tables, sofas, and beds. This allows you to move from measurements on paper to a visual floor plan that you can continue editing as your design develops.
Use the Grid to Maintain Accuracy
When transferring measurements into a digital floor plan, a grid can help keep the layout organized.
A grid gives you a visual reference for positioning walls and objects and helps maintain alignment throughout the drawing. Rather than placing every element by eye, you can use the grid as a consistent reference while building your layout.
This becomes especially useful when the floor plan contains multiple walls, rooms, doors, and furniture pieces. Keeping elements aligned from the beginning can make the final plan much easier to understand.
If you later change the dimensions of the canvas or adjust the scale of the drawing, make sure the relationship between your measurements and the grid remains consistent. The goal is to preserve the proportions of the original space rather than simply making the drawing fit a different canvas.
Common Room Measurement Mistakes
Even a straightforward room can be difficult to measure if you are not sure what information to collect.
One common mistake is measuring only the length and width of the room. Those two numbers describe the overall size, but they do not tell you where the doors and windows are located or how the space can actually be used.
Another mistake is forgetting door-opening directions. A doorway may look correct on paper while the door swing makes a particular furniture arrangement impossible in reality.
Windows are also frequently recorded without their position. Knowing the size of a window is useful, but knowing where it sits along the wall is equally important.
Fixed elements are another area that is easy to overlook. Columns, built-in cabinets, plumbing fixtures, and structural features can significantly change the usable space.
Finally, avoid estimating when you can measure. A small difference may not seem important at first, but several small errors can accumulate and produce a floor plan that does not accurately represent the room.
What You Need to Measure Before Creating a Floor Plan
Before leaving the room, make sure you have collected the information you need.
At minimum, you should have the overall dimensions of the room and the length of every wall. You should also know the width and position of each door and window, along with the location and dimensions of important fixed elements.
For more detailed projects, record ceiling height, wall irregularities, structural columns, built-in storage, and other features that may influence the design.
Once everything has been checked, you are ready to turn your measurements into a proper floor plan.
Final Thoughts
Creating an accurate floor plan starts long before you draw the first wall.
The quality of your final layout depends on how carefully you measure the space. Take the time to measure every wall, locate every opening, record fixed elements, check irregular areas, and verify your measurements before moving into the design stage.
You do not need to create a complicated architectural drawing to get started. A rough sketch and a reliable set of measurements are enough to give you a strong foundation.
Once your measurements are ready, a digital floor planning tool can turn that information into an editable visual layout. You can then experiment with furniture placement, room arrangements, and different design ideas without having to physically change the space.
With Draw Floor Plan, you can take your measurements and build the layout digitally, add walls, doors, windows, and furniture, customize your canvas, and continue refining your floor plan as your project develops.
Measure your space first. Draw it accurately. Then start designing.